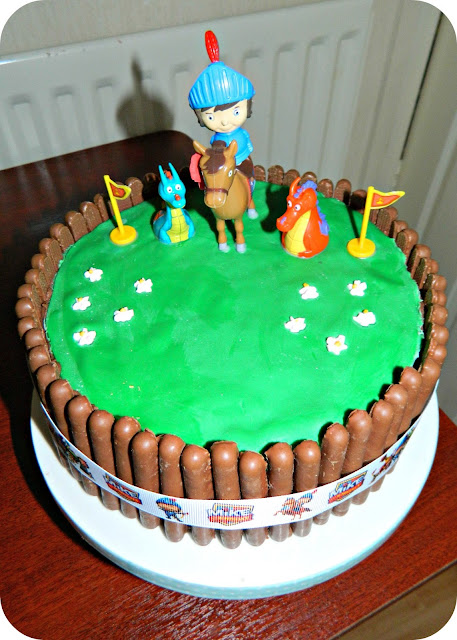
Huzzah for a Homemade Mike the Knight Birthday Cake
Bud loves Mike the Knight. He follows the exploits of the tiny knight and his friends in Glendragon closely and I knew we were expecting some toys and playsets, in addition to a helmet and sword just like Mike's in his birthday presents. I was determined to make his birthday cake this year and, when I asked him what kind of cake he wanted, I wasn't surprised when he requested a Mike the Knight cake. I googled lots but only saw very professional cakes so had to come up with my own idea. This was the finished result, read on for how I made it.
Firstly, apologies for not having step-by-step photos. This is my first ever cake post and I didn't realise it would turn out so well and I would want to blog about it. I know next time!
You will need:
One Cake - Choose your own variety of cake, you could even...shhhh...buy one! I used the recipe for Mummy Mishaps' Raa Raa Cake as I loved the marble effect and I've been wanting to try one of her recipes for ages. I used Nutella to sandwich the three layers together.
For Decoration:
Chocolate Fondant Icing (I bought mine ready made from ASDA - their Chosen by You range - but you could make your own)
1x Pack of Ready to Roll Green Icing (I used Regalice)
3x Packs of Chocolate Finger Biscuits (I used Cadburys)
A length of ribbon (1 metre is long enough, I bought Mike the Knight ribbon on eBay)
Small Icing Flowers (again bought from ASDA's Home Baking range)
Small toys
If you wish to add a name you will need a contrasting colour of ready to roll icing (I used yellow)
How to decorate it:
Once you have your cake baked (or bought) and sandwiched together, place it on a cake board or stand.
Use the chocolate fondant icing to cover your entire cake, top and sides. I used a palette knife to spread it out smoothly.
Sprinkle icing sugar on your works urface and roll out your icing on to it then use your cake tin as a guide to cut a circle of icing for the top of your cake.
Rub icing sugar onto a rolling pin then slide your icing circle onto the rolling pin.
Use the rolling pin to position the icing circle on top of your cake. Lightly press on to it to ensure it is firmly in place.
Next, take your chocolate fingers and place them side by side around the cake. When they are all in place cut a length of your ribbon to size and pin it in place at the back of the cake.
Take your icing flowers and arrange them equally on either side of the top of the cake.
Use small toys to decorate. These actually came from the Mike the Knight Magazine that is available in newsagents and supermarket. We got the finger puppets ages ago and the Galahad and flags were on last month's magazine. They were the perfect size for cake decorations.
Finally,
I placed the birthday candles in the centre of the cake.
I was really pleased with the design of my cake and it tasted great too (thanks to Jenny at Mummy Mishaps!) You could decorate it in any way really, perhaps using Octonauts toys and blue icing with white chocolate finger biscuits? Or using a similar colour scheme to make a Tree Fu Tom cake?
Bud adored his cake and dragged everyone who arrived to see him on his birthday to see it, mostly before they even had chance to take their coats off!


